In this topic, you will learn how to use the Google Tag Manager (GTM) plugin for Brightcove Player.
Overview
Google's Tag Manager (GTM) allows you to track the usage of your websites, video content, and mobile apps. First, you add a container tag to your assets. Then, you use a web-based user interface to customize the individual tags associated with your container tag based on your business rules.
If you are already using Google Analytics, Adwords, and DoubleClick, you may also want to use Google Tag Manager because it integrates well with these tools. GTM offers a large number of variable and trigger options.
Workflow
The GTM plugin first checks for the presence of eventsToTrackand trackerID and then initializes GTM. It then listens for all player events by listening for analytics-beacons or analytics_request events and on every player event, it checks if the event is present in the list of events to track. If it is, the plugin then gets the custom dimensions (that are also present in the paramsToTrack )associated with the event. To learn about the events that are handled in the GA plugin and the custom dimensions associated, see Reviewing events, dimensions and variables.
Major implementation steps
From a high level, here are the major steps you must follow to implement and use GTM:
Create a GTM account and setup a container - these are both part of the initial GTM setup
Copy and paste the container snippets that need to be implemented on your web pages. Google suggests that this code be placed in the <head> tag or immediately after the opening <body> tag
Create tags - for Google Analytics or Brightcove Player
Brightcove's GTM plugin enables you to track Brightcove Player events using the Google Analytics dashboard. The following player events can be tracked:
Player load
Video impression
Video view
Video engagement
Play request
Advanced player events such as ad_mode_begin, ad_mode_complete
Errors which disrupt the playback experience
Tag management terminology
Here are some of the common terms you will encounter when using Google Tag Manager (GTM).
Term
Description
Container
Your tag management system account can have multiple containers (profiles), with its own tags and variables. Each container can have multiple environments, usually set up for development, staging, and production.
Data layer
The data layer refers to the collection of data that lives in the code of your web page. This JavaScript object is used to pass information from your website to your tag manager container. You can then use this information to populate variables and activate triggers in your tag configurations.
Event
Events are data points used to send data to your reporting tool.
These are related to video loading and playback.
Tag
Tags are code snippets placed on your web page to collect user interaction data. Tag management systems simplify the process of adding tags to your site, requiring that you only supply the tag id and tag event type.
Tag marketplace
Tag marketplace templates provide code snippets for deploying a tag.
While this reduces the amount of code knowledge needed, some familiarity with JavaScript and HTML is required for successful implementation.
Tracker
Trackers are objects that collect, store data and send that data to Google Tag Manager.
Trigger
Triggers tell when the code for a tag should be added to a page. These are user-defined conditions.
Requirements
The following requirements are needed to use the GTM plugin:
Brightcove Player v6.46.0 or later.
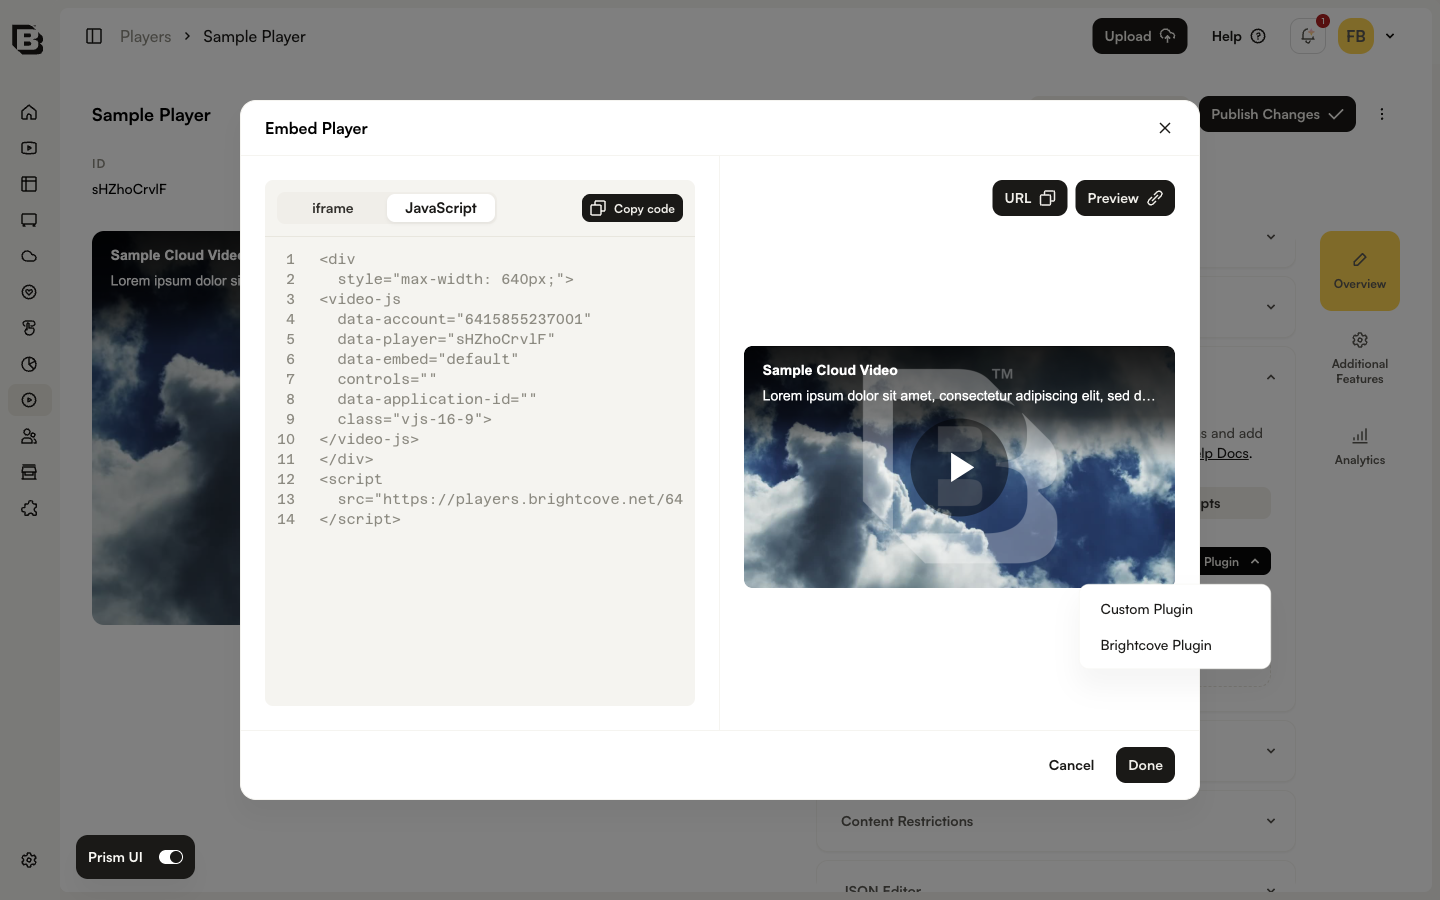
The Google Tag Manager plugin requires that you use the JavaScript (formerly Advanced) embed code when publishing your player. You should NOT use the iframe embed code with this plugin. For details, see the Integrating with Brightcove section.
Reviewing events, dimensions and variables
Choose the events and dimensions that you want to track from Brightcove Player.
Events
Any event name used by Brightcove player's analytics-beacon event can be used, but the following have special handling in the GTM plugin.
Event
Description
player_load
Player has been loaded and is operational
video_impression
Video has been loaded into a player and is ready for playback
video_view
Video has started playing back either through auto-play or user interaction
video_engagement
A user watches a range of seconds of a video's timeline. This event is a heartbeat for tracking video engagement and will likely be sent many times during playback, depending on the user interaction and the length of the video.
play_request
Playback is initiated either by the user expressly clicking the play button, or automatically when the platform triggers playback in an auto-play scenario
ad_mode_begin
Control is handed over to an advertising agent by the playback platform
ad_mode_complete
Control is handed back from the advertising agent to the playback platform
error
A fatal error has occurred which disrupts the playback experience
video_complete
Video playback finishes
Dimensions
The following dimensions will be sent for all events(except error)
Parameter
Description
bcvideo_account
Video Cloud Studio account ID
bcvideo_destination
Playback location
bcvideo_platform_version
Brightcove Player version
bcvideo_player
Brightcove Player ID
bcvideo_player_name
Brightcove Player name
bcvideo_session
Session associated with the player
bcvideo_video
Video ID
bcvideo_video_name
Video name
bcvideo_tags
List of tags associated with the video
Event-specific dimensions
These custom dimensions will be sent in specific events.
Parameter
Description
bcvideo_video_playhead
Sent in play_request and engagement events
bcvideo_video_duration
Sent in engagement event
bcvideo_range
Sent in engagement event
bcvideo_video_percent_viewed
Sent in engagement event
bcvideo_video_seconds_viewed
Sent in engagement event
bcvideo_video_milestone
Sent in engagement event
GTM Variables
These are Brightcove parameters you can create as GTM variables.
Variable name
Description
account
Brightcove account ID
player
Player ID
player_name
Player Name
platform_version
Platform version number
session
Session identifier
video
Video ID
video_name
Name of the video
range
The range of seconds viewed in the format StartSecond..EndSecond
seconds_viewed
Count of watched seconds
duration
The duration of the video in seconds
percent_viewed
Percentage of video watched
error
Platform specific error code associated with the event
milestone
Milestone (25%,50%,75%,100%) completed by the video
playhead
The time in the video at which the event is triggered
destination
URI that originated the event
Set up Google Tag Manager
To set up Google Tag Manager follow these steps:
Steps
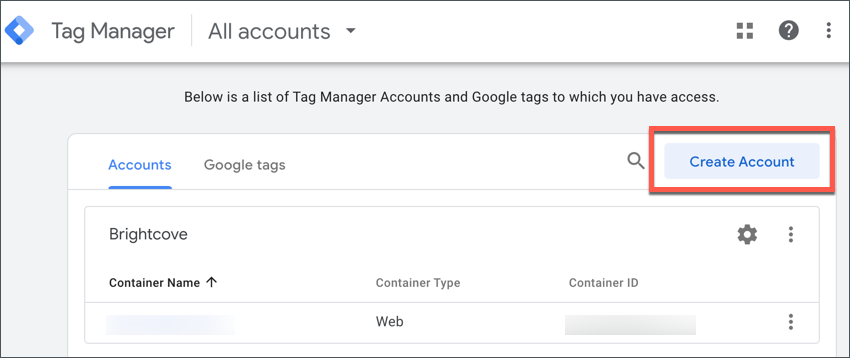
In Tag Manager, create an account or use an existing account. To create a new account, click the Create Account button.
By default, a new container is created for a new account. You can create additional containers within each account.
Create account
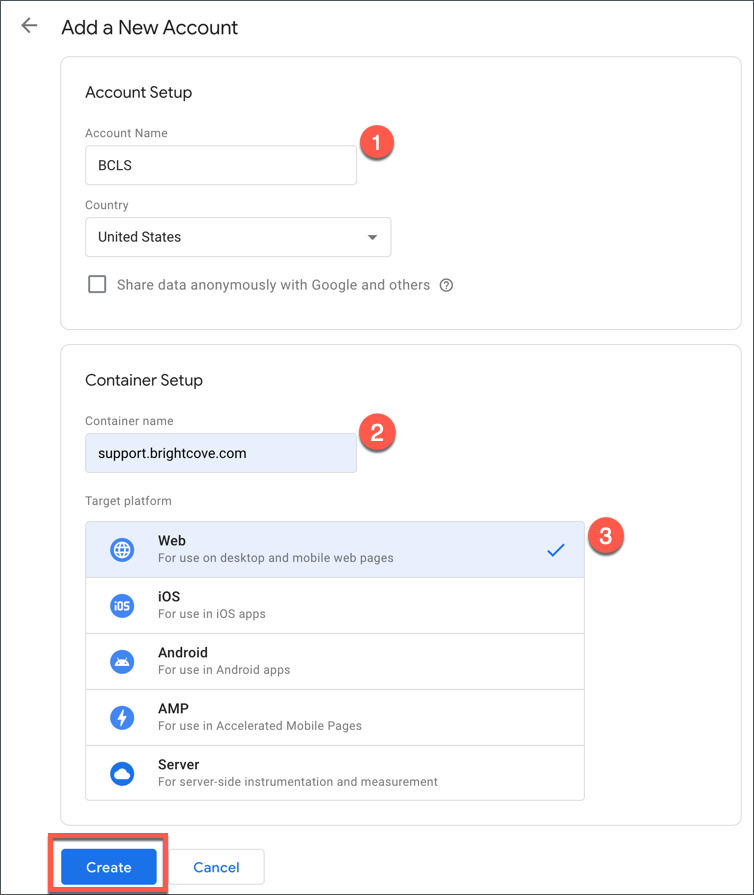
Enter the values for your new account page, including the account name and container name, and select a target platform.
New account information
Click the Create button.
Agree to the terms of service.
Creating Triggers, Variables & Tags
Every Brightcove event that you want to track must be created as an Event Tag in Google Tag Manager (GTM). The event IDs from GTM will then be used inside the Players module. This allows Brightcove event data to be passed to GTM events.
For each Event Tag, you need to create a GTM trigger to send the event to Google Analytics. Then, in the GTM Variables tab, you will create the custom parameters associated with each event.
Prerequisites
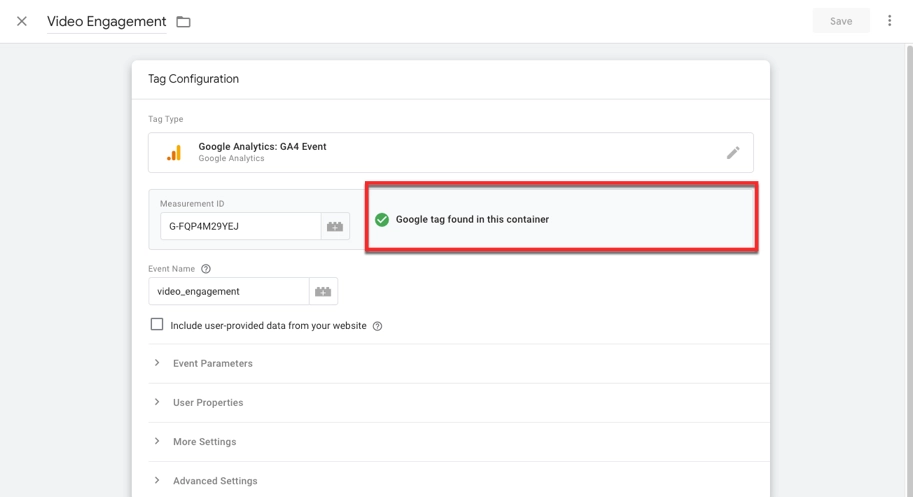
First, you have to add one Google Tag type tag in order to add tags of type Google Analytics: GA4 Event. To do it, follow these steps:
In Tag Type, add Google Tag.
google-tag
Notice how you see a Google tag found in this container message. If you forget this step, you will see a negative message.
google-tag-success
Adding Triggers to GTM
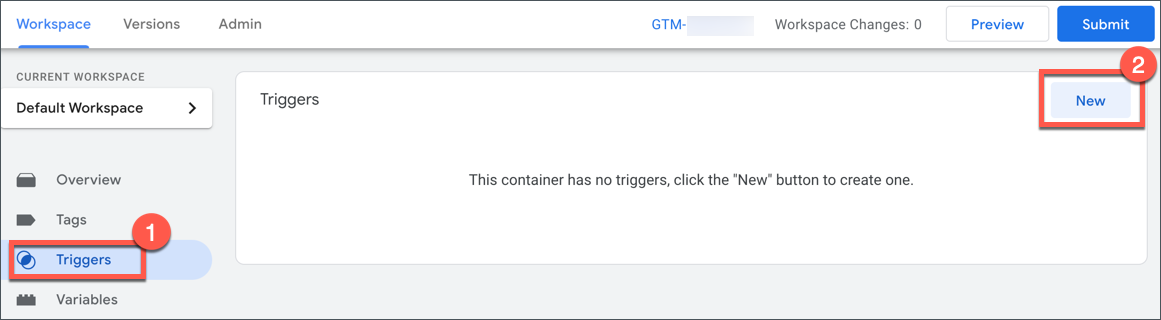
After determining which events you want to track, create a Trigger in Google Tag Manager.
To create Triggers in Google Tag Manager, follow these steps:
Login to your Google Tag Manager account
Click Triggers in the left side navigation, and click the New button
Create a new trigger
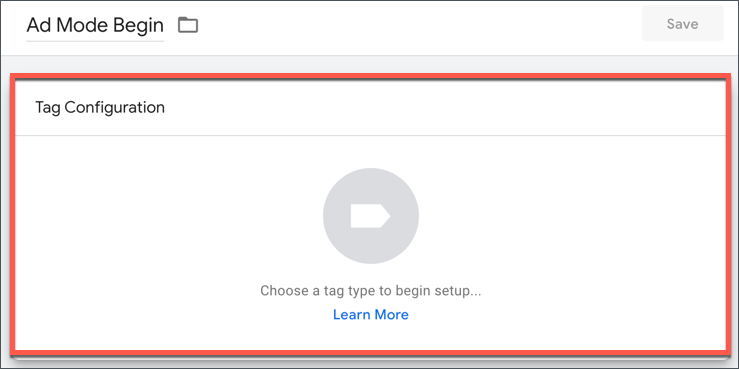
Click on the Trigger Configuration box
Trigger Configuration
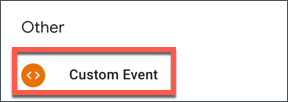
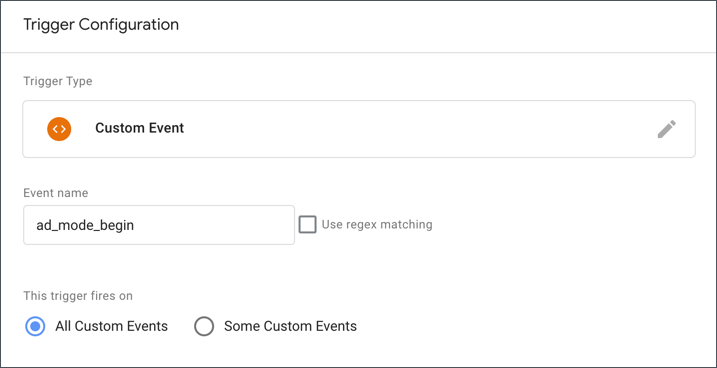
Select the Trigger Type as Custom Event.
Trigger configuration
Enter the Event name. The event name should look similar to the image below.
Trigger configuration name
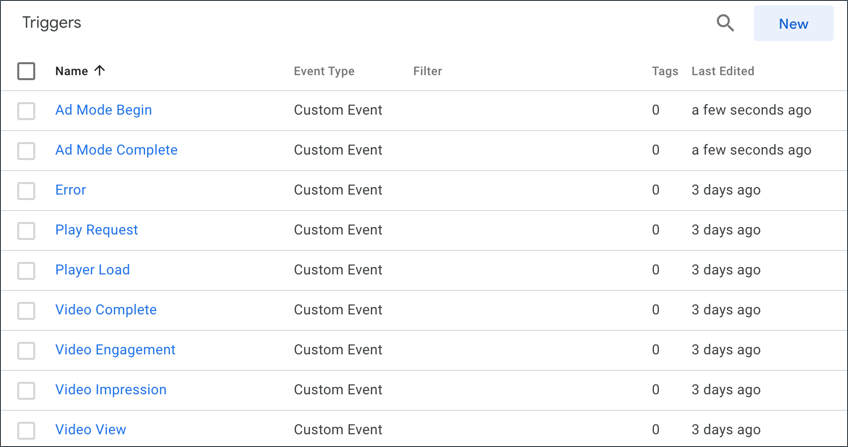
Create a Trigger for each Event that you want to track.
Your Triggers should look similar to this in GTM:
Triggers in GTM
Adding Variables to GTM
Brightcove parameters carry additional data and are passed with events. Every Brightcove parameter that will be recorded must be created as a Variable in Google Tag Manager. The parameter name will be used inside the player, allowing Brightcove parameters to be passed to Google Tag Manager Variables.
To create Variables in Google Tag Manager, follow these steps
Login to your Google Tag Manager account
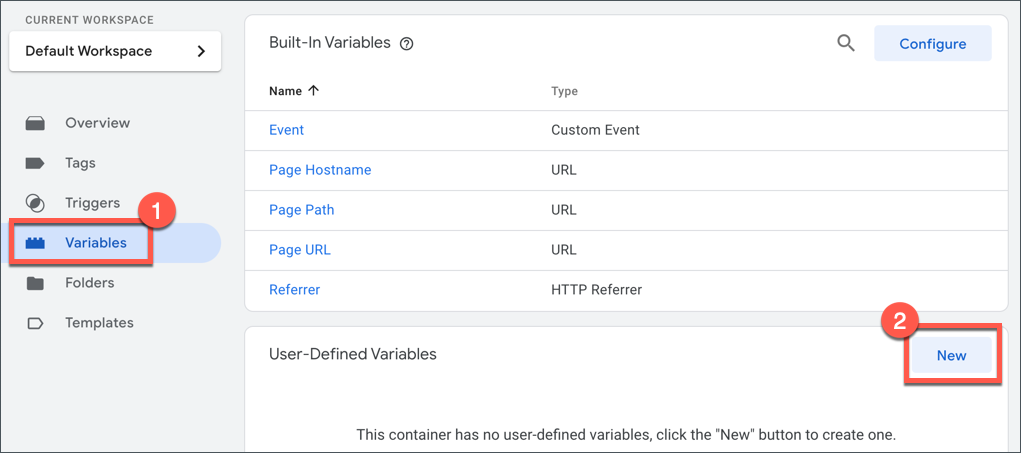
Click Variables in the left side navigation.
In the User-Defined Variables section, click the New button
Data Layer Variable
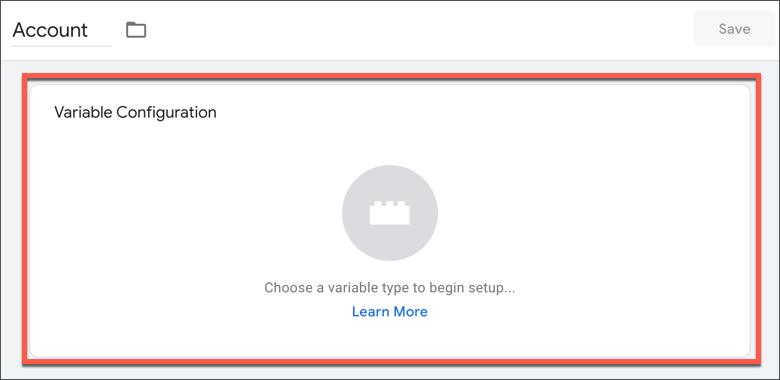
Click on the Variable Configuration box
Variable Configuration
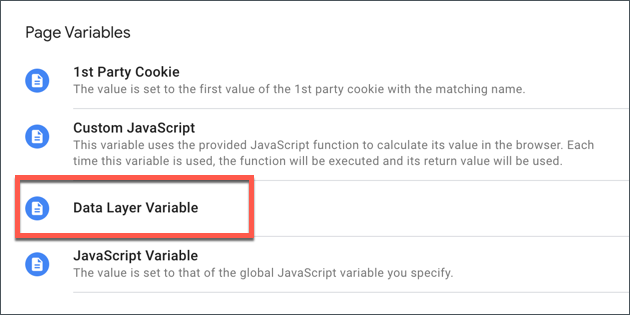
For variable type, select Data Layer Variable.
Data Layer Variable
These are the configuration details:
Data Layer Variable Name - Name of the variable
Data Layer Version - Version 2
Then create the variables required to reflect the Brightcove parameters. In this case, the name of the Data Layer Variable should match what is in the player’s JSON config for paramsToTrack after customDimensions in the GTM variable. To see a list of the Brightcove parameters you can create as GTM variables, see here.
Here is an example:
Account variable
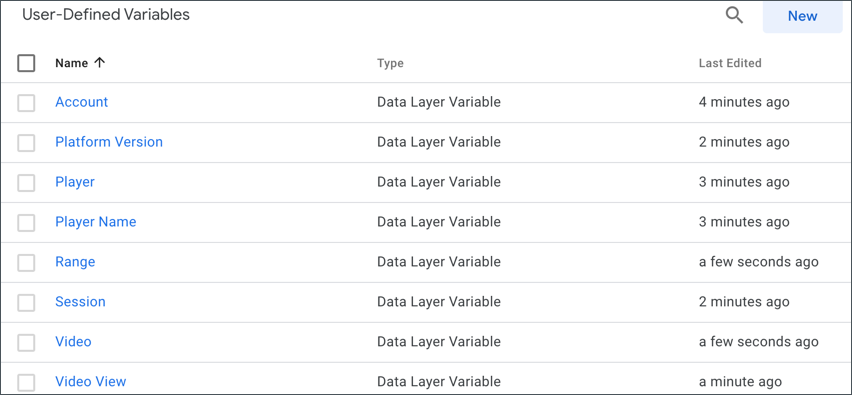
Your user-defined Variables should look similar to this in GTM:
User-defined variables
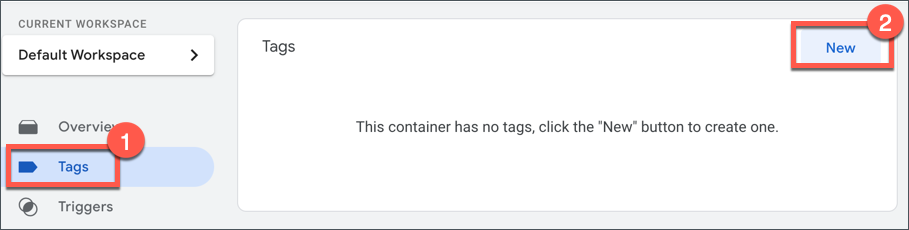
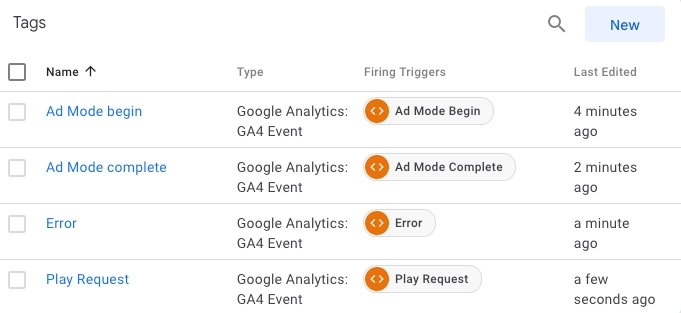
Adding Tags to GTM
For each event you want to track, a Tag must be created in Google Tag Manager.
To create Tags in Google Tag Manager, follow these steps
Login to your Google Tag Manager account
Click Tags in the left side navigation, and click the New button, and then click Tag Configuration.
Create a new tag
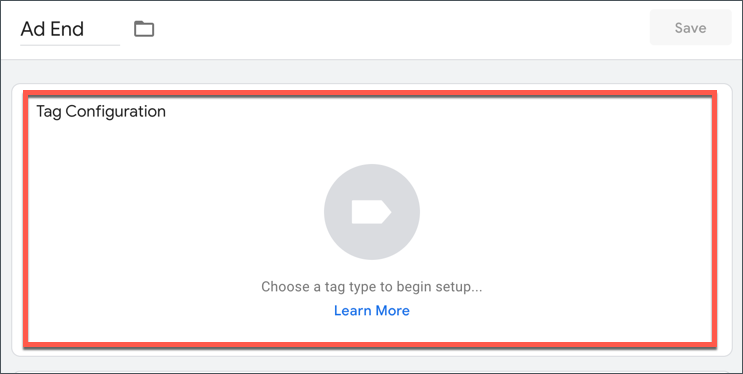
Click on the Tag Configuration box
Tag Configuration
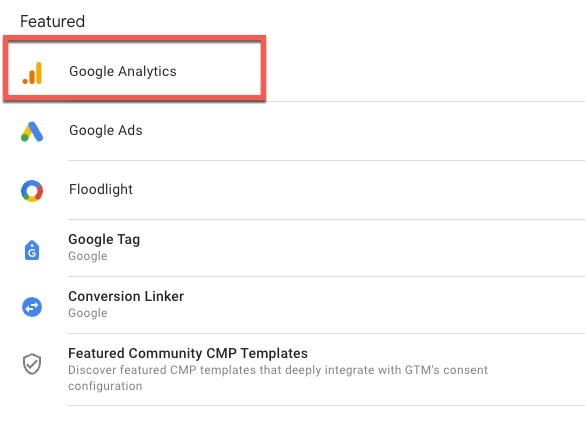
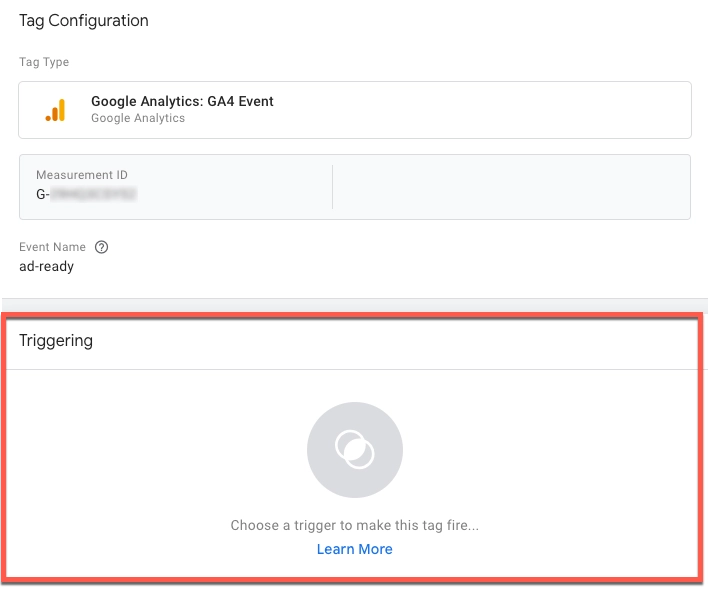
Select Google Analytics.
Tag configuration
Select the Tag Type as Google Analytics: GA4 Event.
Tag configuration
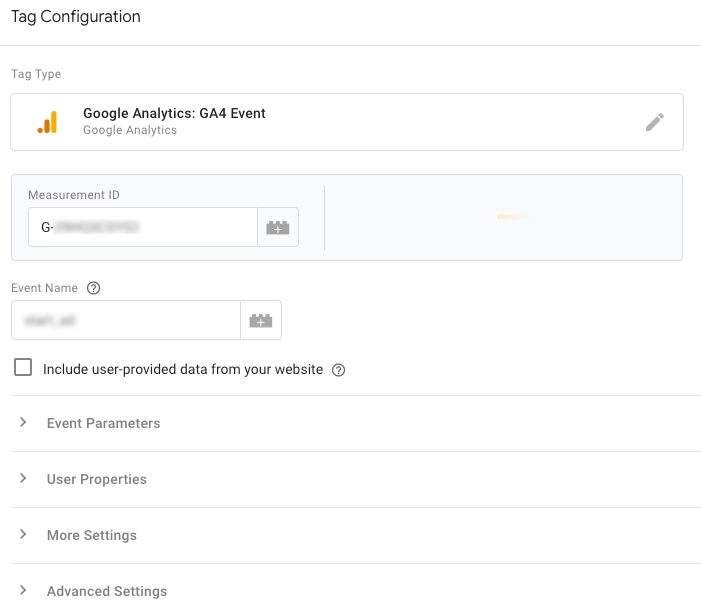
Enter the tag details:
Measurement ID - Enter your "G-" ID, or select the variable.
Event Name - Specify the name of the event.
Keep the user-provided data option checked if you want to get more insights with data that people provide to your website.
Optional settings:
Parameters - Add any parameters to configure in Fields to Set.
Custom properties - Add any custom user properties to configure in User Properties.
Here is an example:
Tag configuration
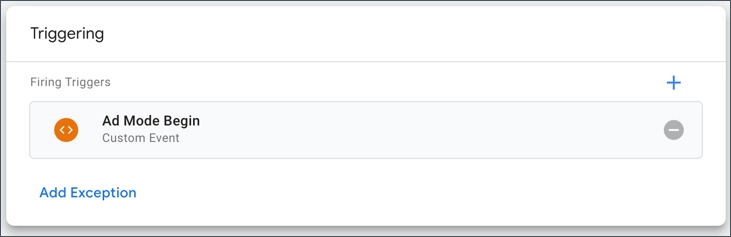
Then click on the Triggering box
Triggering
Select the corresponding trigger to to make the tag fire.
Trigger
Your Tags should look similar to this in GTM:
Tags in GTM
Integrating with Brightcove
To integrate GTM with Brightcove Player, add the Google Tag Manager plugin to your player.
Using Studio
The following steps detail using Video Cloud Studio to load the plugin.
In Video Cloud Studio, open the PLAYERS module and either create a new player or locate the player to which you wish to add the plugin.
Click the link for the player to open the player's properties.
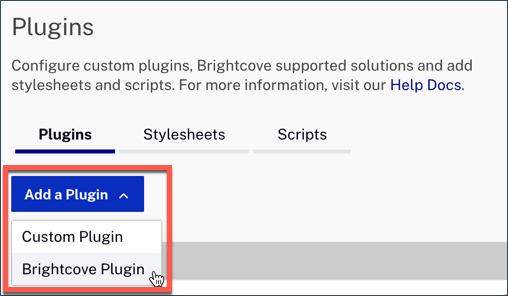
Expand the Plugins section on the Overview tab.
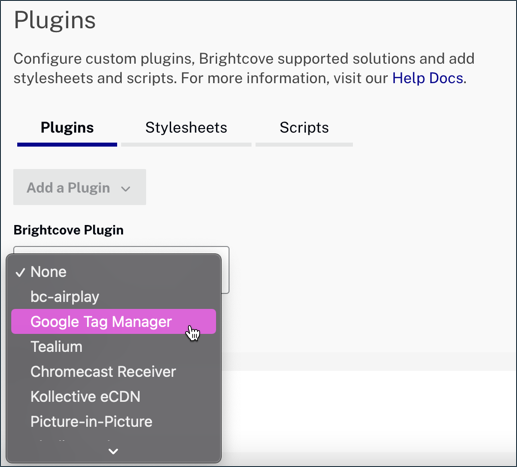
Next, click the Add Plugin button, and then select Brightcove Plugin.
Add Plugin button
Expand the Brightcove Plugin dropdown and select Google Tag Manager.
Google Tag Manager plugin
To tell the player which events and custom dimensions you want to track, create a JSON object to paste into the Options(JSON) text box.
Field descriptions:
tracker - Your Google Tag Manager tracking id (GTM-XXXXXXX)
eventsToTrack - Events you want to track
paramsToTrack - Custom dimensions you want to track
milestones - An array of integers to alter the milestones from the default of 25, 50, 75, 100%. Of course, this is only applicable when bcvideo_video_milestone is being tracked.
The Google Tag Manager plugin will now appear in the list of plugins for your player.
To publish the player, select
Publish Changes.
To close the dialog, click Close.
Return to the MEDIA module and publish your video or playlist using the player you just updated for Google Tag Manager. Choose the JavaScript embed code to publish your player.
JavaScript embed code
When your player loads and the user interacts with the player, the specified events and parameters will be tracked.
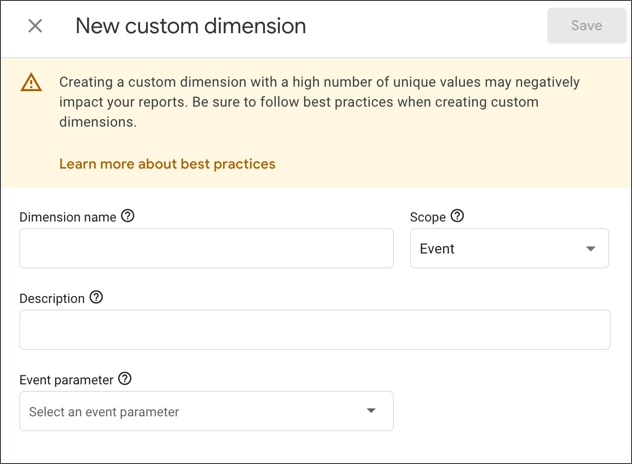
Creating custom dimensions
Custom dimensions are metrics that you create yourself in Google Analytics. Use the follow steps to create the custom dimensions in the Google Analytics UI:
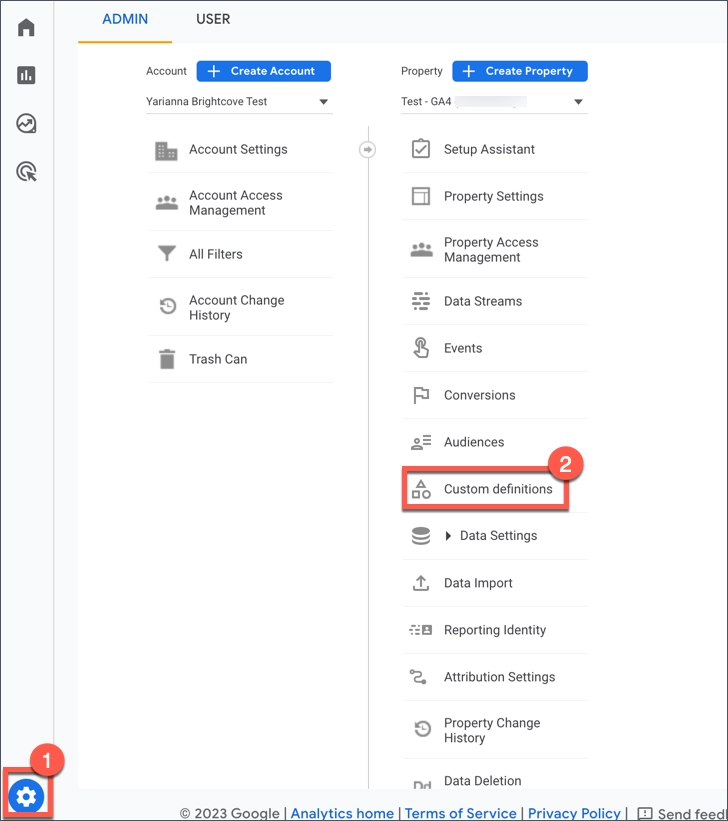
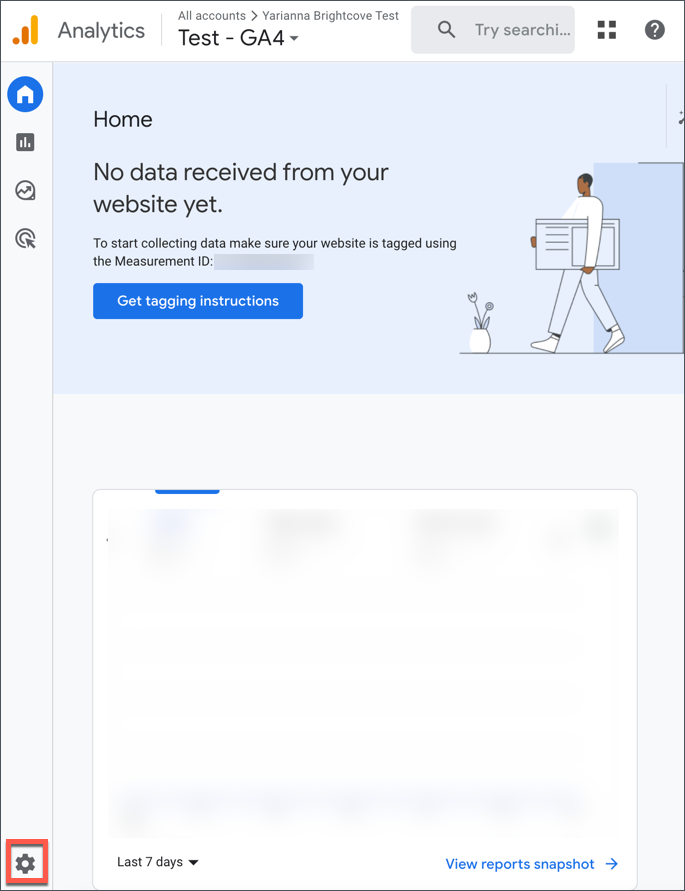
Login to your Google Analytics account.
In the GA page:
Click Admin (gear icon) in the bottom-let of the UI.
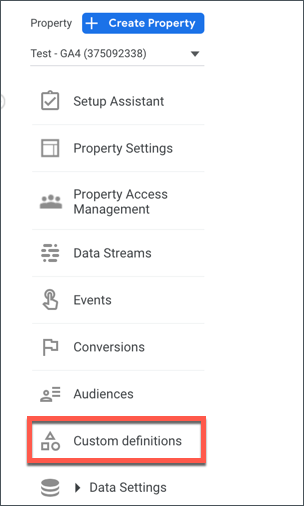
In the Property column, click Custom Definitions.
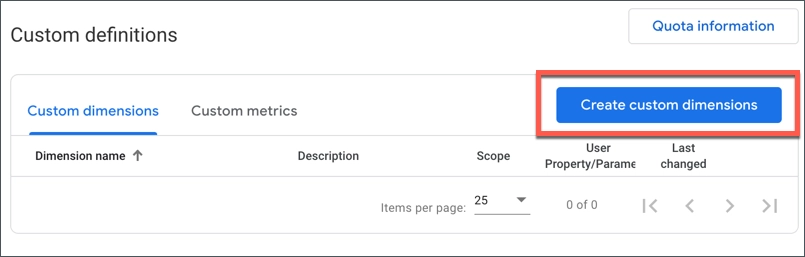
Click Create custom dimension.
Fill in the fields with the necessary information:
Dimension name: Friendly name for your parameter.
Scope: This is always Event for Brightcove GA plugin.
Description: Add appropriate description.
Event parameter: Choose one of the parameters listed just above.
For further information on using the Google Analytics UI, see the following:
[GA4] Custom dimensions and metrics: Create dimensions and metrics from event parameters and user properties so you can easily access data in reports and explorations
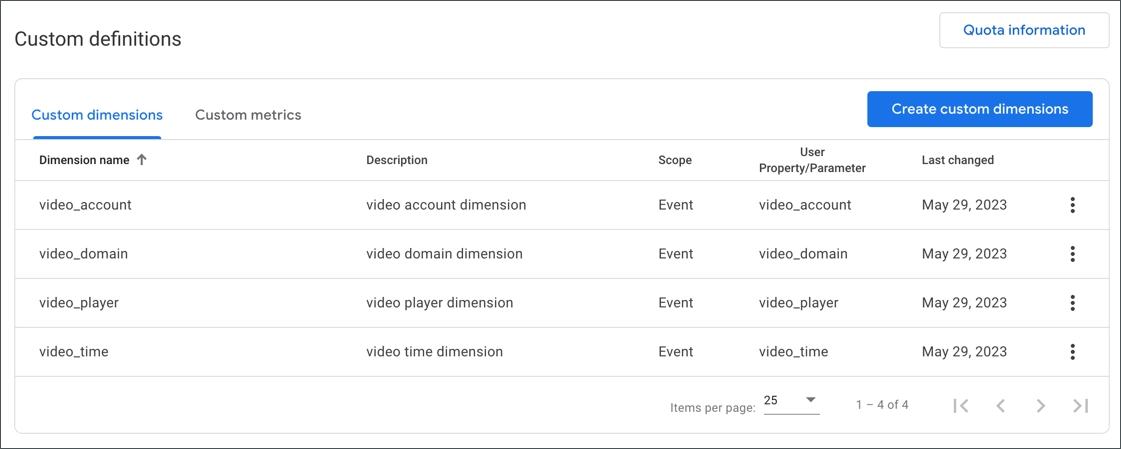
Viewing custom dimensions
To view custom dimensions in Google Analytics, follow these steps: